Relocated coolant bottle
 08-15-2014, 08:36 PM
#1
Rex Kramer-Thrill Seeker
SuperBike
Thread Starter

Join Date: Jan 2011
Location: Brookfield, WI
Posts: 2,312

Relocated coolant bottle
At the moment, I am heading home from a job, riding shotgun and messing on my iPad. I figured that I would at least get this thread going.
This is born out of a need to get one's big hands into the frame to adjust Jack Flash's Thumb Fuel Screws. There was some talk about relocating the coolant bottle before here and here.
I had placed a 2" x 5" metal tube behind the right radiator and found that, although small, it has enough volume for our coolant system.
I had this 2" x 5" tube placed near the rear of the right radiator and towards the inside of the bike. While this worked just fine, I didn't like the fact that it was blocking airflow through the radiator. After working on another members bike, I found that once the PAIR system has been deleted, there is a fantastic spot to put the coolant overflow bottle. It can be attached to the bottom of the airbox.
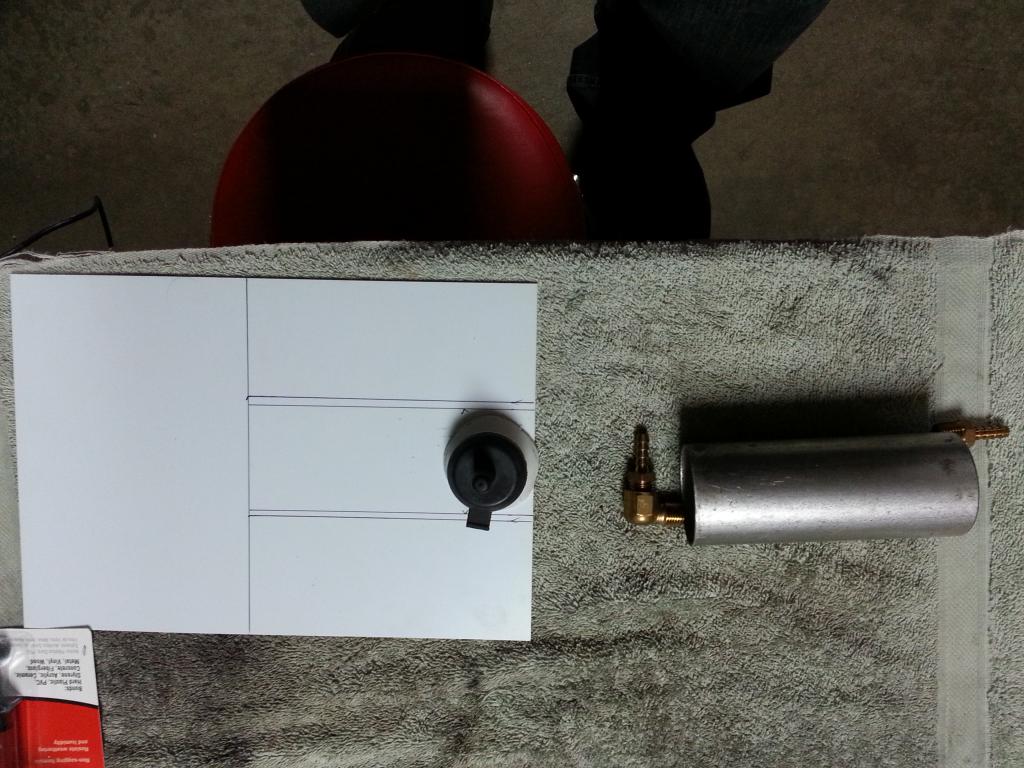
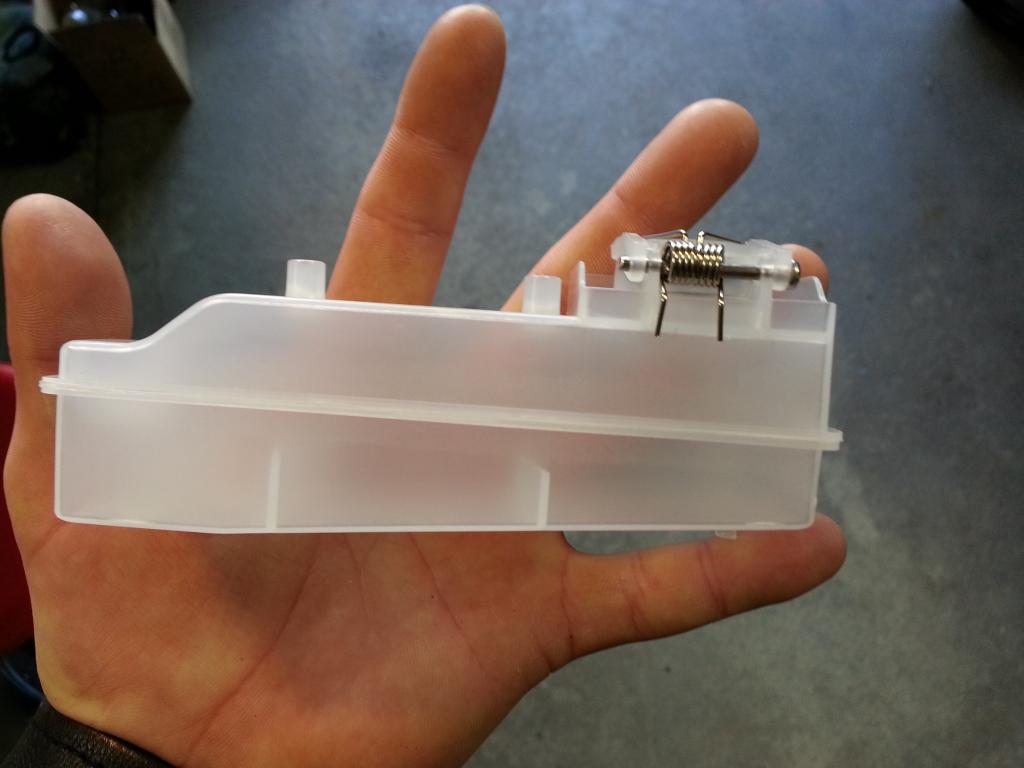
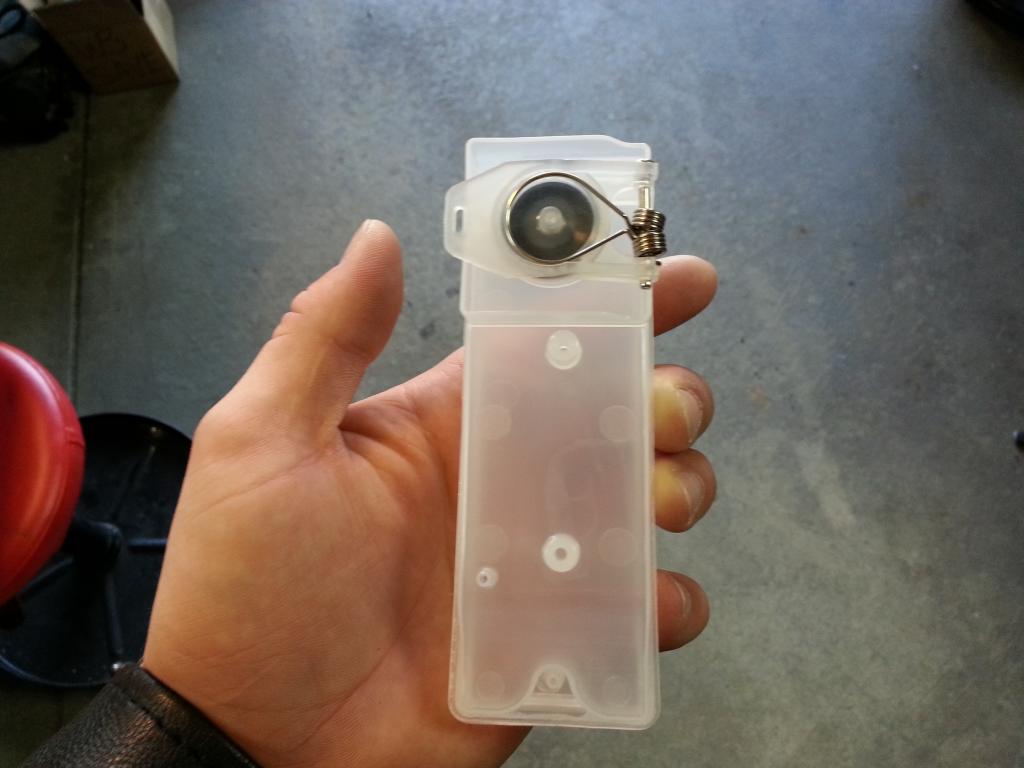
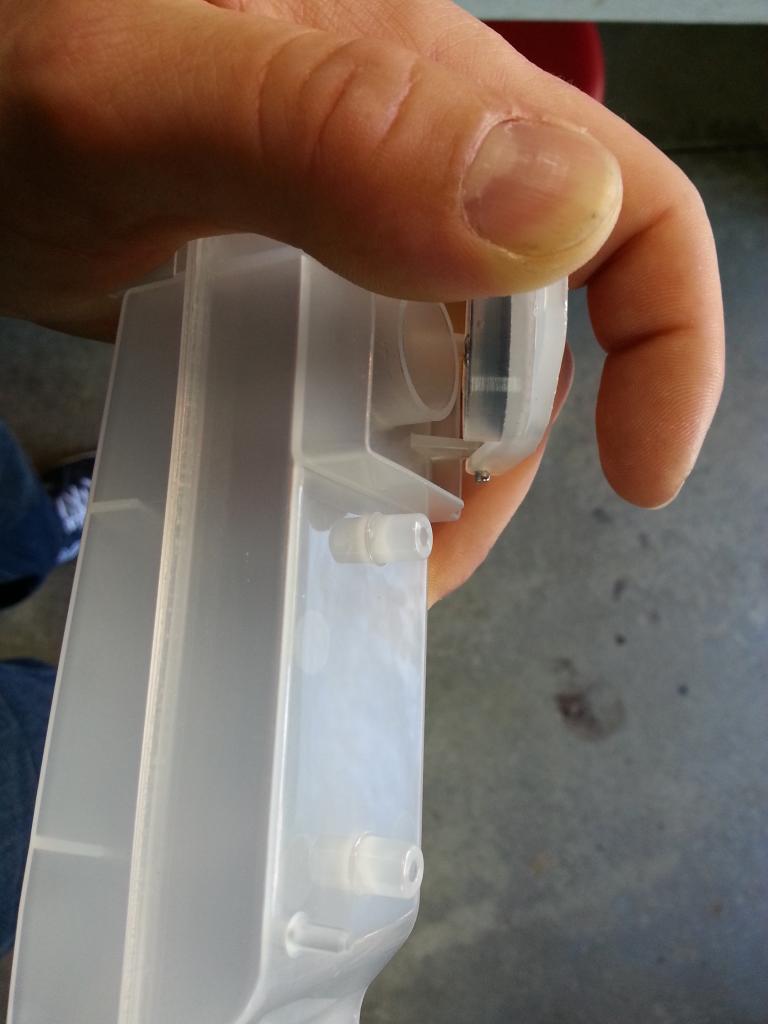
I will elaborated on this stuff some more tomorrow. Here are some random pictures to get you guys by for now. The pictures of the white plastic is me making a plastic coolant bottle with a stock filler cap. It turned out quite well actually. More pictures this weekend!
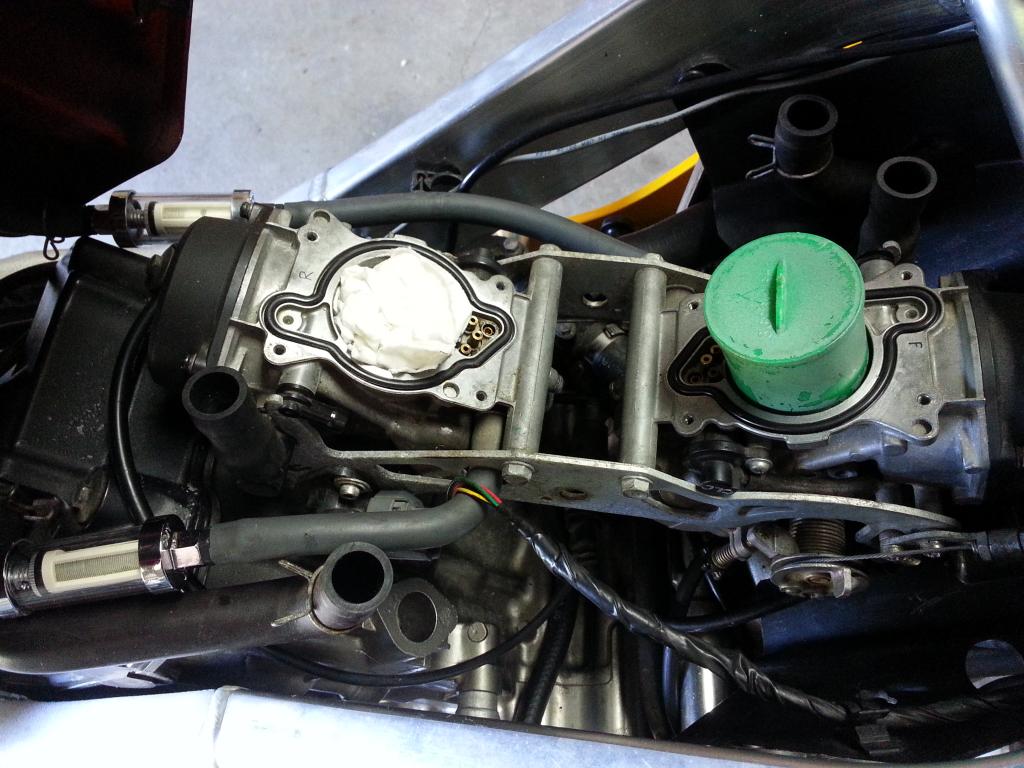

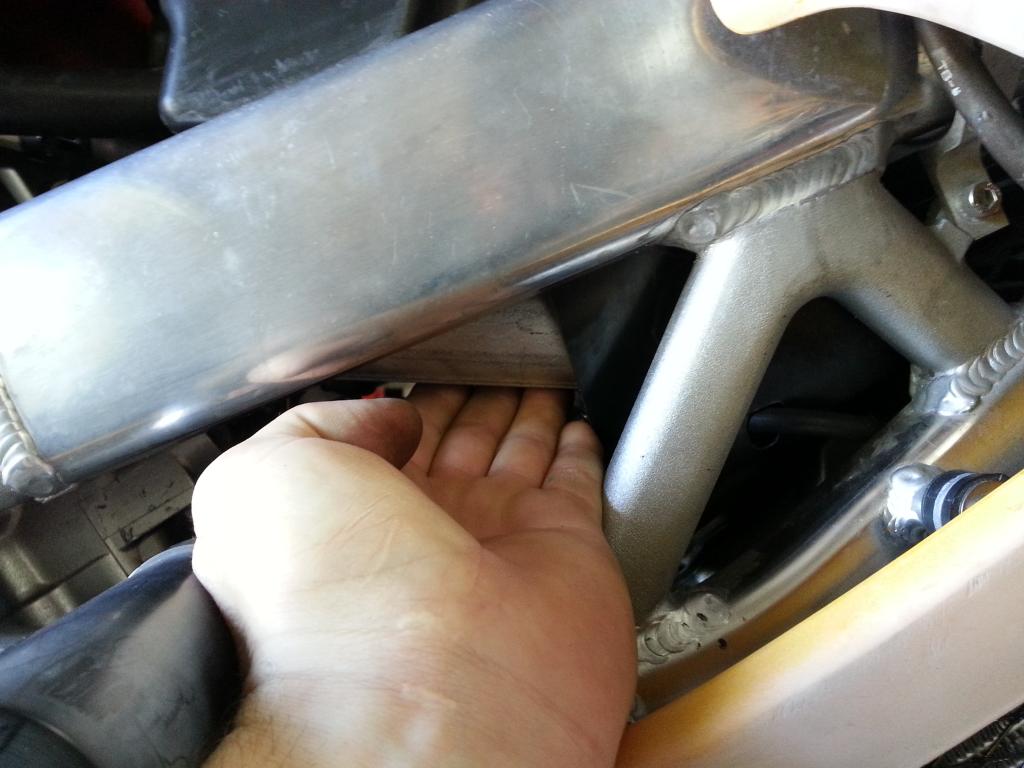
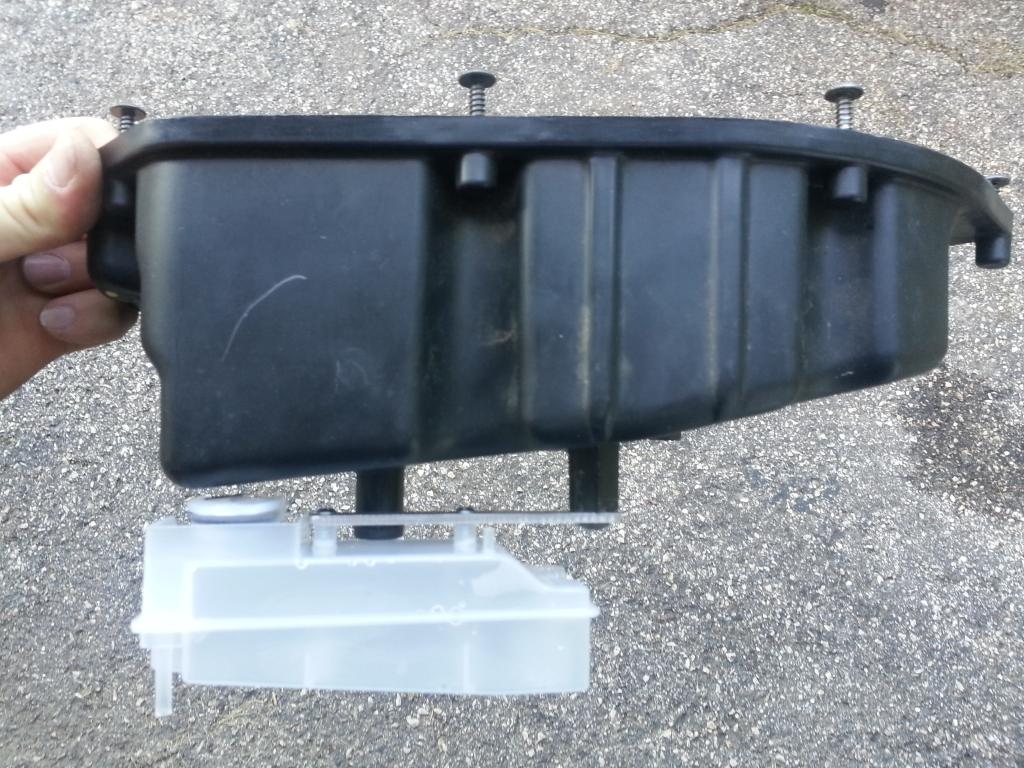
Once the PAIR system is removed, this is one of the attachment points underneath the airbox for the relocated coolant bottle.
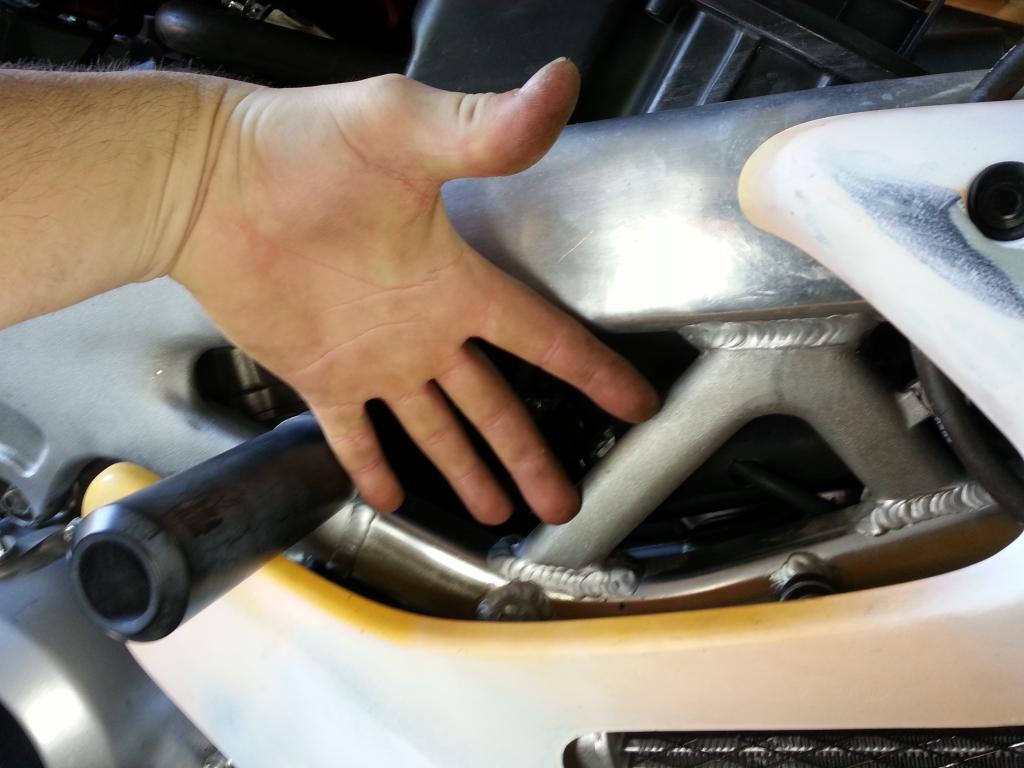
At my fingertips, here is a trial fitting of the 2" x 5" metal tube under the airbox. Yes, it fits quite nicely, but a plastic bottle would look better.
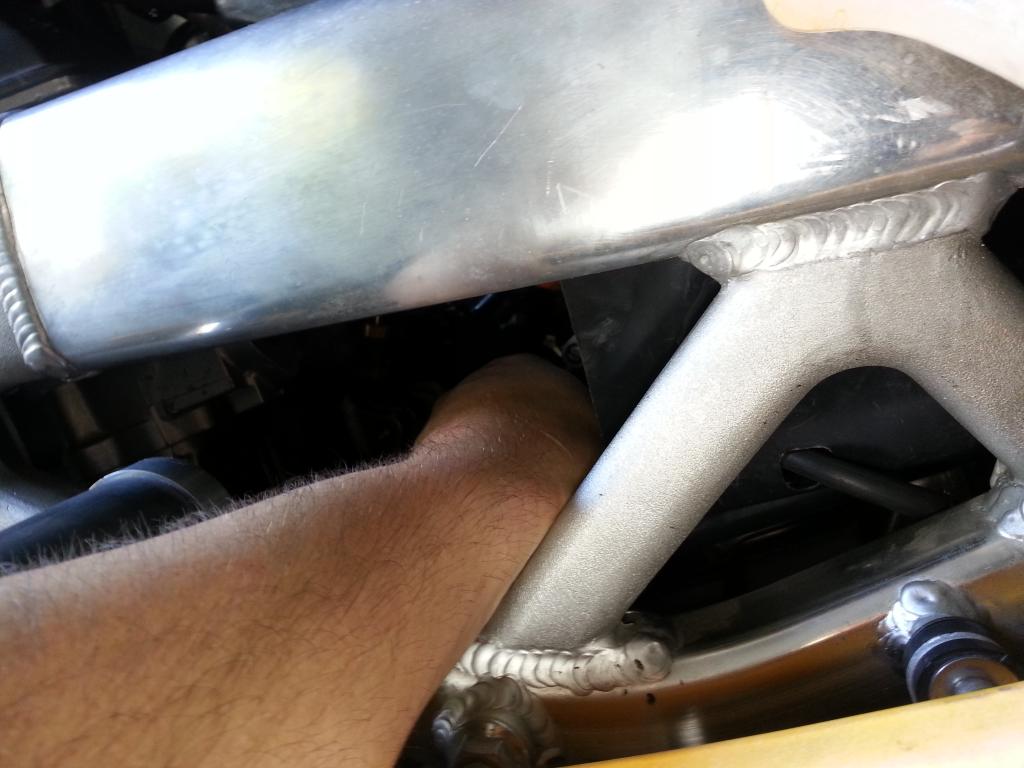
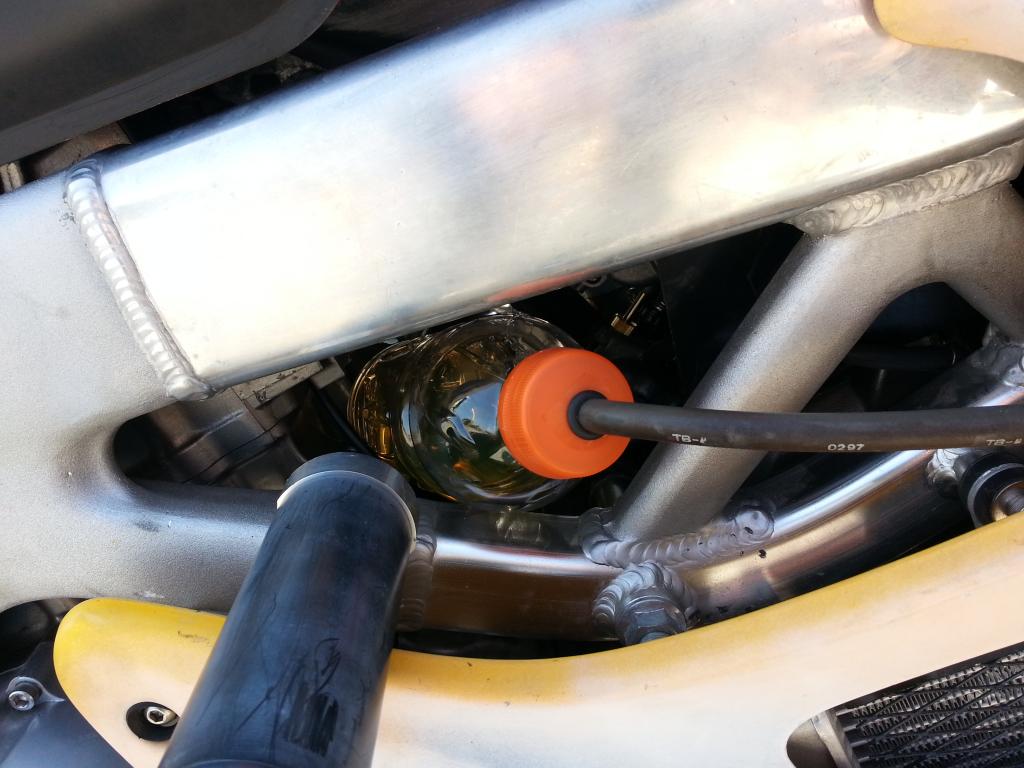
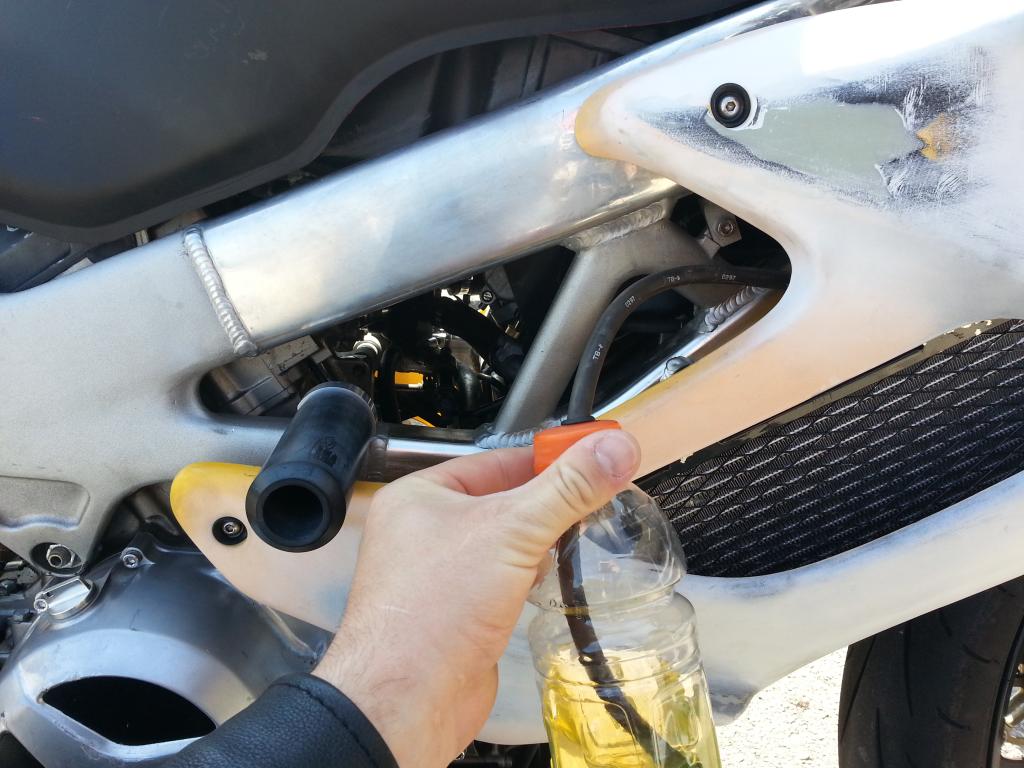
Here I am finding how much fluid is displaced with our coolant system. Hey, it worked.
I will have several questions and also some explainations this weekend.
This is born out of a need to get one's big hands into the frame to adjust Jack Flash's Thumb Fuel Screws. There was some talk about relocating the coolant bottle before here and here.
I had placed a 2" x 5" metal tube behind the right radiator and found that, although small, it has enough volume for our coolant system.
I had this 2" x 5" tube placed near the rear of the right radiator and towards the inside of the bike. While this worked just fine, I didn't like the fact that it was blocking airflow through the radiator. After working on another members bike, I found that once the PAIR system has been deleted, there is a fantastic spot to put the coolant overflow bottle. It can be attached to the bottom of the airbox.
I will elaborated on this stuff some more tomorrow. Here are some random pictures to get you guys by for now. The pictures of the white plastic is me making a plastic coolant bottle with a stock filler cap. It turned out quite well actually. More pictures this weekend!
Once the PAIR system is removed, this is one of the attachment points underneath the airbox for the relocated coolant bottle.
At my fingertips, here is a trial fitting of the 2" x 5" metal tube under the airbox. Yes, it fits quite nicely, but a plastic bottle would look better.
Here I am finding how much fluid is displaced with our coolant system. Hey, it worked.
I will have several questions and also some explainations this weekend.


 08-16-2014, 09:27 AM
#4
Rex Kramer-Thrill Seeker
SuperBike
Thread Starter
Join Date: Jan 2011
Location: Brookfield, WI
Posts: 2,312
Kenmoore, I appologize for not posting this stuff sooner. I mentioned that I would make a thread last week, but I got called out of town and that kind of threw a wrench into my plans. I just posted what was already on my phone. I still need to take pictures of everything mounted and post them.
I'll take some pictures of the new plastic coolant bottle that goes under the airbox. What's funny, is it looks like the stock coolant bottle, but like half the size. The cap sits right next to the rear valve cover. So, to fill the bottle or check the fluid level, you just lift the tank.
My question is, would mounting the coolant bottle under the airbox be a better spot? It works great on my bike. However, this is what was done in order for the new mounting spot.
-Removed carb coolant lines (not necessary, but it makes more room)
-Removed PAIR system
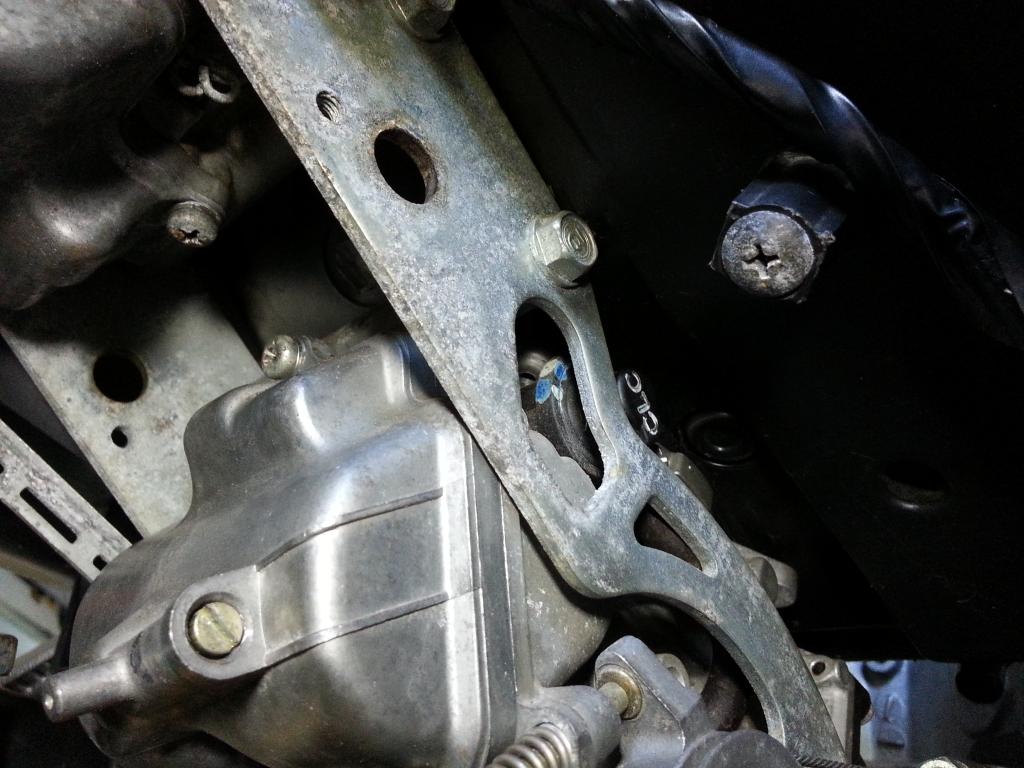
Another question, and this is for those that have removed the PAIR system, do you have a mount on the bottom of the right side of your airbox like I do? (shown in picture #5 from the top...or bottom)
Just thinking out loud here, but I got the coolant bottle relocated to behind the right radiator and it worked just like stock. But recently seeing a better spot, I want to pursue this mounting location instead. I guess, if there are people out there that have not removed thier PAIR system, then the relocation to behind the right raciator would work. Otherwise, for those that have removed the PAIR system, then the relocation to under the airbox would work. However, since my free time lately has been almost nonexistent, I would like to make just one relocation kit for those that wanted it. Decisions, decisions.
I'll take some pictures of the new plastic coolant bottle that goes under the airbox. What's funny, is it looks like the stock coolant bottle, but like half the size. The cap sits right next to the rear valve cover. So, to fill the bottle or check the fluid level, you just lift the tank.
My question is, would mounting the coolant bottle under the airbox be a better spot? It works great on my bike. However, this is what was done in order for the new mounting spot.
-Removed carb coolant lines (not necessary, but it makes more room)
-Removed PAIR system
Another question, and this is for those that have removed the PAIR system, do you have a mount on the bottom of the right side of your airbox like I do? (shown in picture #5 from the top...or bottom)
Just thinking out loud here, but I got the coolant bottle relocated to behind the right radiator and it worked just like stock. But recently seeing a better spot, I want to pursue this mounting location instead. I guess, if there are people out there that have not removed thier PAIR system, then the relocation to behind the right raciator would work. Otherwise, for those that have removed the PAIR system, then the relocation to under the airbox would work. However, since my free time lately has been almost nonexistent, I would like to make just one relocation kit for those that wanted it. Decisions, decisions.
08-24-2014, 03:41 PM
#5
Senior Member
SuperBike
SuperBike

Join Date: Feb 2013
Posts: 1,509
I want the under the airbox relocation. Can you post or pm specifics on what i need to make this happen? Just today i needed to tweak the carb mixture screws and i couldn't because the coolant bottle was in the way... 
James
James
08-24-2014, 08:18 PM
#10
Senior Member
MotoGP

Join Date: Jul 2007
Location: NYC
Posts: 5,033
This is a great project. I guess the issure is that the coolant bottle needs in and out tube. There is space behind the fairing kinda in the snorkel intake thing. My racebike has it up there.
I dont love the idea of lifting the tank to add coolant. I like to check it often. Sadly this is like 10th on my project list.
I dont love the idea of lifting the tank to add coolant. I like to check it often. Sadly this is like 10th on my project list.
09-01-2014, 09:52 AM
#11
Rex Kramer-Thrill Seeker
SuperBike
Thread Starter
Join Date: Jan 2011
Location: Brookfield, WI
Posts: 2,312
I am a newbie at fabricating with plastic. I have done quite a few projects like, simple boxes, right angles for mounts, etc., but none as complex as this coolant bottle. Here is the issue I had. I thought that I had all the same type of plastic when building the plastic tank (the one that mounts to the underside of the airbox). Apparently not. I choose Styrene for the body and turns out that tube that runs down the center of the bottle was ABS. When you weld them together, they stick, but the weld does not work. This let loose and fell apart after a few rides. I was quite embarassed and didn't want to show my shoddy work.
[I plastic welded most of this. However, you can use plastic epoxy just the same. All plastic I mention is styrene]
How I made it
I figure, the less seems I have, the better. So, I made a wooden buck in the shape and size of the coolant bottle. I then use a heat gun and soften a 2.25" wide (the width of the coolant bottle) sheet of plastic and wrap it around the wooden buck. After it cools, it holds the shape of the wooden buck. Now, where the two ends of that sheet touch each other, I then weld that seem. I now have a continious piece of plastic.
I then place that shaped piece onto a sheet of styrene and trace the outline. I do that for both sides. Then cut the sheet. I then weld both sides on. I now have a coolant bottle.
Next step, is to cut the holes. First, a hole for the top, where the cap for the bottle is. I found forming the neck and cap out of plastic took way too much time, so I cut the top off of an old BMW coolant bottle I had laying around. You could also use the Superhawk's coolant bottle neck and top for this, if you have one available to you. Since I didn't know what type of plastic the BMW coolant bottle was made out of, I couldn't weld it. So, I used plastic epoxy to fasten the neck onto the new coolant bottle. Next, is the hole for the coolant expansion & return. I used a 1/4" styrene tube for this and cut it to length. I was worried about the hose possibly coming off, so I heated the end of the styrene tube a little bit and then pushed it down onto a hard surface, trying my best to keep it perpendicular to the surface. This deforms the end a bit and makes a rib.
Now, the cap on the BMW coolant bottle has a hole in it for coolant overflow (looks like a baby's bottle nipple). I don't mind a little coolant on my engine, if it was ever to happen. So, I left it alone. However, if you use the Superhawk's coolant bottle neck & cap, you will need to make an overflow. Just drill another hole and weld a 1/4" tube to the coolant bottle as high as you can. You can then attach a hose to this and have the coolant overflow hose run down and come out underneath the bike, just like stock.
Next step is drilling a hole completely through the center of the coolant bottle, from the top to the bottom. If you look under the airbox, there is but one screw to attach this coolant bottle to. After much thought on how to fasten this coolant bottle to the airbox with one screw, I came up with using a 3/4" plastic tube with a plastic washer of sorts on the inside of that tube. If you look at the fastening point under the airbox, it is a solid plastic rod, for lack of better words, with a hole at the end where a screw screws in. The screw goes through the center of the plastic washer that fits inside the plastic tube. The 3/4" plastic tube fits over the plastic rod on the airbox. This tube is then slid through both holes and welded to the coolant bottle. The coolant bottle is then slid onto the plastic rod underneath the airbox. Where the coolant bottle bottoms out, this is where the plastic washer is located inside the plastic tube. Mark where it goes and weld it in place.
The coolant bottle is now finished.
I would like to use ABS plastic to fabricate this with. I really don't like styrene. Anybody know where I can purchase ABS in thin sheets and 3/4" tube? I just now remembered Aircraft Spruce & Specialty. I'll check them out.
I will post pictures later.
Last edited by CruxGNZ; 09-01-2014 at 10:07 AM.
09-16-2014, 09:37 AM
#13
Rex Kramer-Thrill Seeker
SuperBike
Thread Starter
Join Date: Jan 2011
Location: Brookfield, WI
Posts: 2,312
One thing I realized that I never posted was the volume of coolant displaced when the engine was hot. The amount is about half a cup (only measuring device I had handy) of fluid for my '98 Superhawk.
I had to hit up a hobby store and while I was checking out some items, I noticed that RC boat fuel tanks were exactly the size and volume needed for the coolant bottle! The decent ones have a screw on cap, and two nipples. You can get the right size on eBay for $12-$20. All that time spent fabricating that dang plastic, and there are ones already made. What makes me mad, is years ago, I used to have RC boats, monster trucks, and cars. It just never popped in my mind.
Anyways, I'm buying a few tanks and will let you guys know which one works the best under the airbox.
Looking at tanks like these:
This one
This one
And possibly this one
Or...maybe tuck this I.V. bag somewhere? Maybe...maybe not.
09-16-2014, 10:00 AM
#14
Retired- but not tired!
SuperBike
Join Date: Aug 2010
Location: Pittsburgh
Posts: 1,478
I amt thinking about relocating the stock one to under the seat/undertail area. I figure if people can stick mufflers, radiators & fans up there the stock bottle might fit too. But the RC boat bottles look pretty promising esp the first one.
09-16-2014, 02:58 PM
#15
Senior Member
MotoGP
Join Date: Jul 2007
Location: NYC
Posts: 5,033
I too would be mad about fabbing on only to see a machine beat you to it.
No way am I trusting a coloscomy bag for my precious hawk's coolant.
Does the overflow bottle have to be the same hieght as the stocker?
No way am I trusting a coloscomy bag for my precious hawk's coolant.
Does the overflow bottle have to be the same hieght as the stocker?
09-16-2014, 03:14 PM
#17
Rex Kramer-Thrill Seeker
SuperBike
Thread Starter
Join Date: Jan 2011
Location: Brookfield, WI
Posts: 2,312
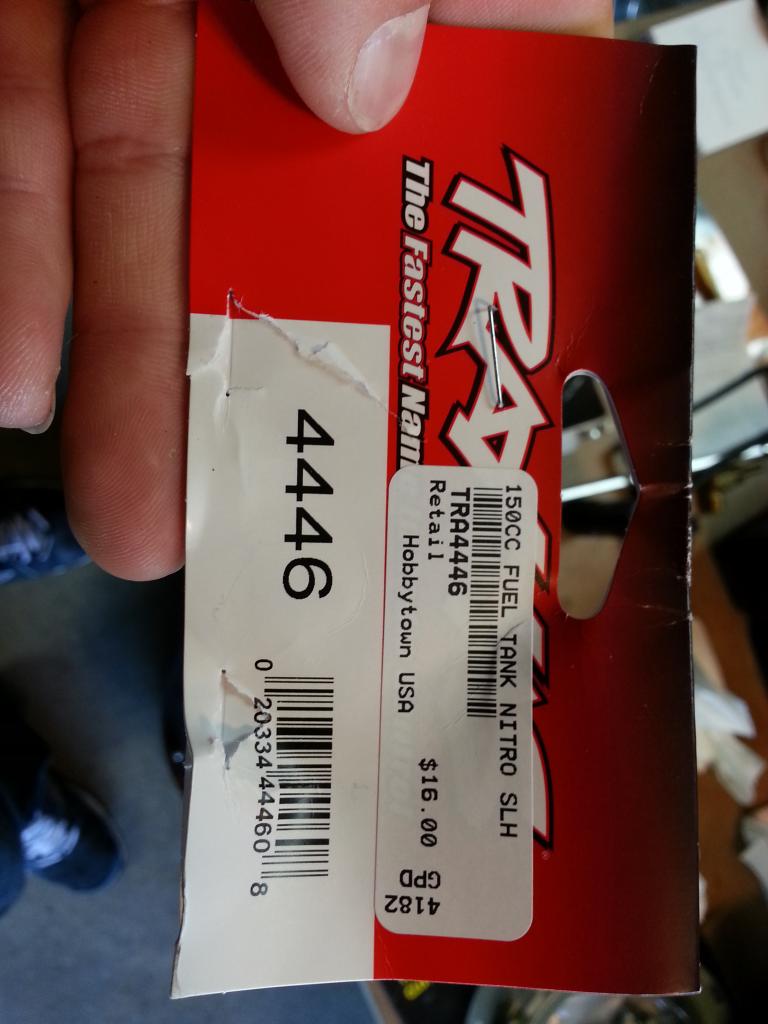
Had the day off today (was in the E.R. yesterday. Got problems with my ticker), so against dr.'s orders, I flew over to a hobby store. Now, I know there are cheaper ones on eBay, but this one was right there in my hands. Clerk even let me take it outside to my bike to check and make sure it fits.
Here she is. Fits perfectly guys.
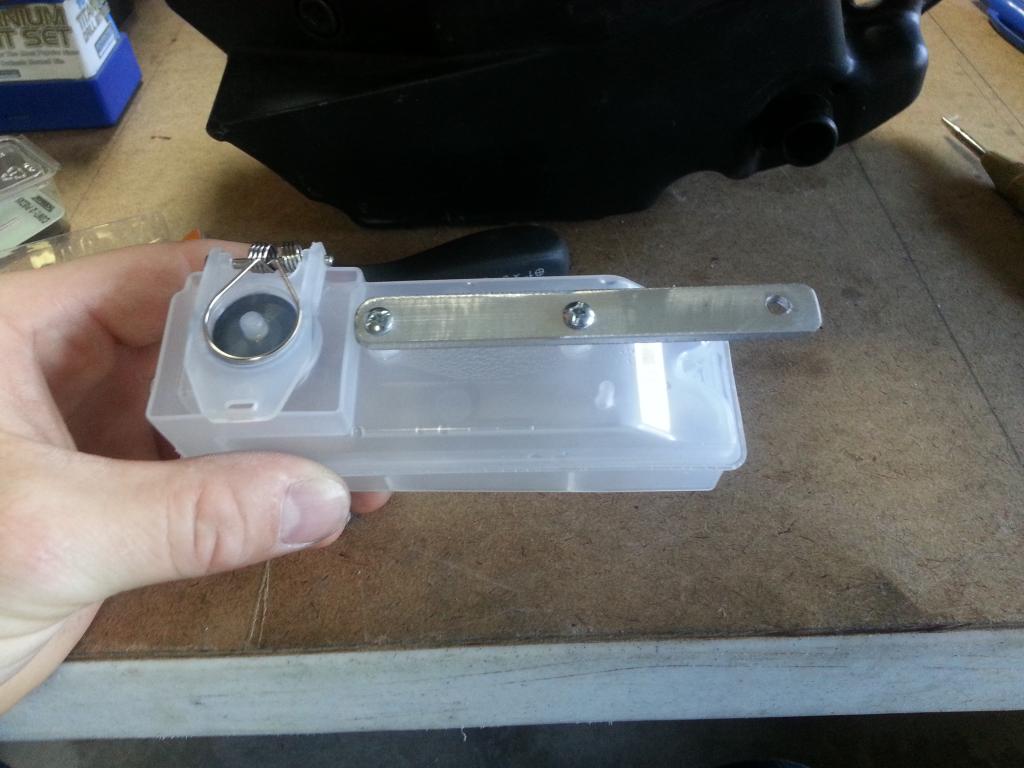
In the picture below, see the two bosses on top? These make for a fantastic attachment point. An aluminum bracket can be made super easy to hang this coolant bottle underneath the airbox. I'll post the pictures of the bracket when I make it.
The coolant expansion line from the radiator will attach to the nipple on the very bottom of the picture. The coolant bottle overflow will attach to the nipple on the left of the bottom attachment point.
In the picture below, the nipple underneath on the left is for any overflow/spill from filling the RC fuel tank. This can be left alone or cut off.

Sorry it's off 90 degrees.
Here she is. Fits perfectly guys.
In the picture below, see the two bosses on top? These make for a fantastic attachment point. An aluminum bracket can be made super easy to hang this coolant bottle underneath the airbox. I'll post the pictures of the bracket when I make it.
The coolant expansion line from the radiator will attach to the nipple on the very bottom of the picture. The coolant bottle overflow will attach to the nipple on the left of the bottom attachment point.
In the picture below, the nipple underneath on the left is for any overflow/spill from filling the RC fuel tank. This can be left alone or cut off.
Sorry it's off 90 degrees.

 09-17-2014, 04:02 AM
#22
road racer v2 power
Superstock
Superstock

Join Date: Jan 2011
Location: coventry england
Posts: 265
Just two cable/zip ties to the frame .
Simple 2 minute job :-) .
Fill it half way job done .
I've had it fitted for months and it's fine and easy to see and check .
When/if you need to top it up just wiggle it out
Simple 2 minute job :-) .
Fill it half way job done .
I've had it fitted for months and it's fine and easy to see and check .
When/if you need to top it up just wiggle it out
09-17-2014, 06:58 AM
#25
Well take off, eh.
SuperBike

Join Date: Jun 2012
Location: QC, Canada
Posts: 1,201
Crux, my question to you is the plastics resistance to heat. That plastic bottle looks pretty thin. Perhaps you may want to test putting boiling water in it first before installing it. Discovering the hard way it won't resist to extreme heat coming from the coolant its self, or, engine may leave you frustrated, and with a dirty bike.
Not trying to criticize, just food for thought.
Not trying to criticize, just food for thought.
09-17-2014, 12:32 PM
#27
Rex Kramer-Thrill Seeker
SuperBike
Thread Starter
Join Date: Jan 2011
Location: Brookfield, WI
Posts: 2,312
Crux, my question to you is the plastics resistance to heat. That plastic bottle looks pretty thin. Perhaps you may want to test putting boiling water in it first before installing it. Discovering the hard way it won't resist to extreme heat coming from the coolant its self, or, engine may leave you frustrated, and with a dirty bike.
Not trying to criticize, just food for thought.
Not trying to criticize, just food for thought.
EDIT: The heavy spring on the top makes it very hard to hold open while pouring a boiling liquid inside. Burned the crap out of my left pinky finger haha. The good news Mr. Flash, is there are no issues with a boiling liquid inside the Traxxas container. Just as rigid as before. I tried taking a picture, but it doesn't show the steam coming from the top.
Last edited by CruxGNZ; 09-17-2014 at 02:05 PM. Reason: Updating
09-17-2014, 02:57 PM
#28
road racer v2 power
Superstock
Superstock
Join Date: Jan 2011
Location: coventry england
Posts: 265
Genuine HRC Honda Racing Overflow Expansion Catch Tank Radiator Water Bottle | eBay
hrc bottle .
the bottle is for race bikes and can take the heat with out problems
hrc bottle .
the bottle is for race bikes and can take the heat with out problems
09-17-2014, 03:26 PM
#29
Rex Kramer-Thrill Seeker
SuperBike
Thread Starter
Join Date: Jan 2011
Location: Brookfield, WI
Posts: 2,312
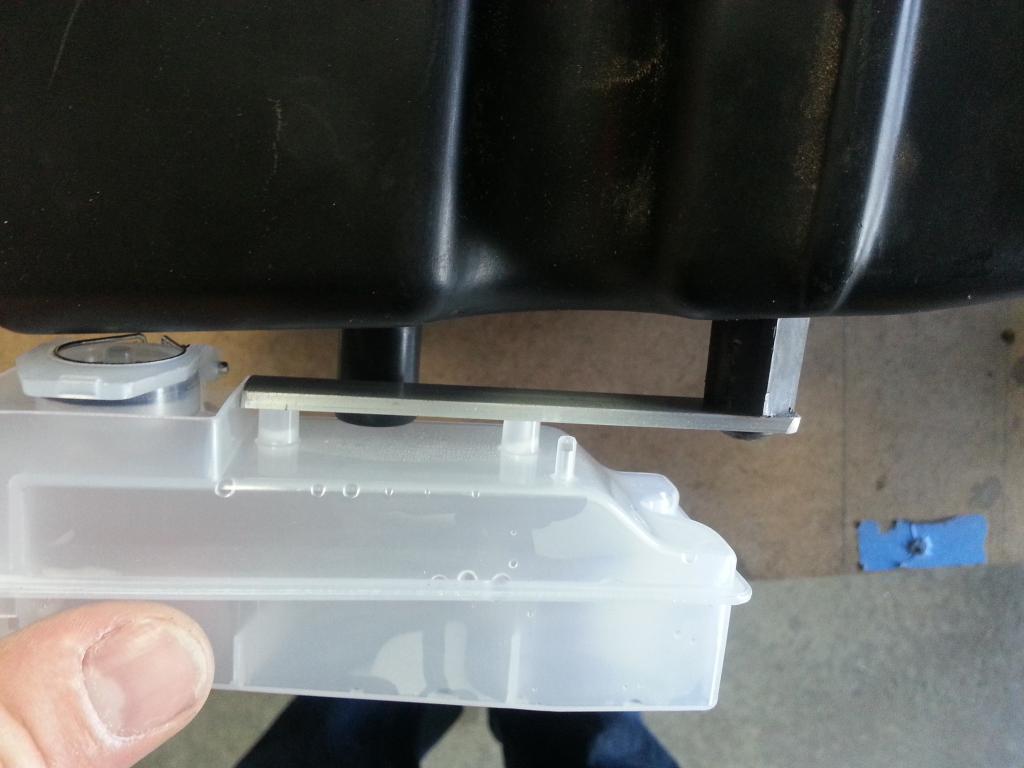
Made a simple bracket real quick, but in my haste, I didn't realize that I was measuring against a vacuum tube, which would make the coolant bottle sit back another 3/4"-1", hiding it completely when looking from the side. Which is great, because I don't want to see it out in the open (just a personal preference). I realize that there is a drawback to this bracket design and location. To fill the coolant bottle, you need to either lift the tank, or remove one screw.
Here's some pictures. I'll make another bracket to push it back the 3/4"-1"
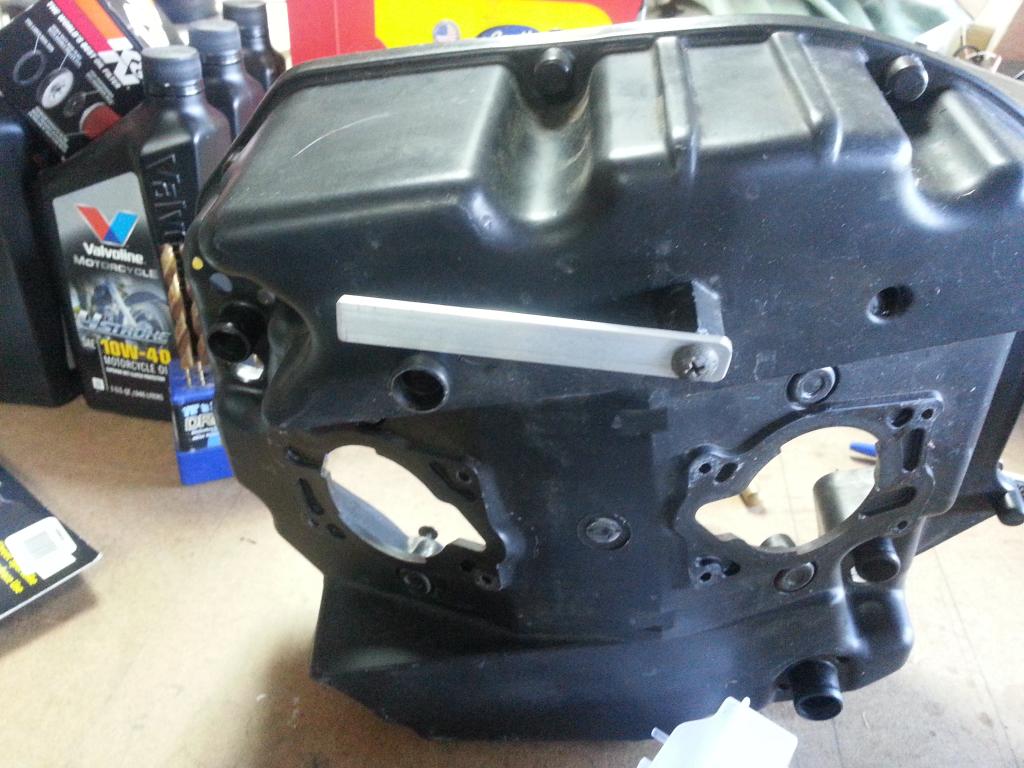
In the picture below, the nipple left over from the PAIR removal is left in place and doesn't interfere with attaching the coolant bottle in this location. So, no need to modify the airbox.


Here's some pictures. I'll make another bracket to push it back the 3/4"-1"
In the picture below, the nipple left over from the PAIR removal is left in place and doesn't interfere with attaching the coolant bottle in this location. So, no need to modify the airbox.
Last edited by CruxGNZ; 09-17-2014 at 03:36 PM.


